Picture the scene. A lovely spring morning, dry roads and blue skies. You wheel the bike out of the garage, don helmet and gloves, turn the ignition key and press the starter button. And, instead of the anticipated growl from the engine, all you get is a frustrating ‘click’ from somewhere beneath a side panel. The chances are, if you're running a classic Japanese bike, it will have happened to you at least once. Usually, assuming the battery is okay, starter problems of this type can be traced to a dodgy solenoid, but just occasionally the starter motor itself can throw its toys out of the pram. This is frequently one of the most neglected parts of the bike, and like everything else, a little routine maintenance will usually put things right.
For step-by-step images and captions, click on the image gallery.
Enjoy more Classic Motorcycle Mechanics Magazine reading every month.
Click here to subscribe & save.
Captions
Picture one: The starter motor is simply an electric motor, and is similar in design to those found in everything from washing machines to Scalextric model cars. This GSX1100 starter is held together with two long screws. Once removed I can lift away the end cover and brush plate to reveal the innards.
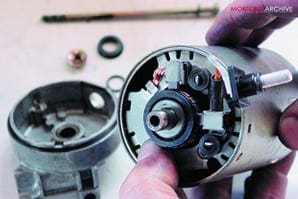
 Picture two: The armature now pulls out of the starter motor body. The armature comprises of a series of electrical windings, all coated in epoxy insulation. Each set of windings is soldered to a pole of the commutator, the segmented copper section on the left. At the right, a ball bearing supports the armature in the starter body.
Picture three: Looking downwards into the starter body, you can clearly see the four permanent magnets fixed around the inside. An electric current passed though the armature windings causes them to be attracted and repelled by these magnets, which in turn makes the armature spin.
Picture four: The segments between the commutator poles should be clear. Any surplus carbon deposits that have built up here can be gently scraped away with a small screwdriver, but be careful not to scratch either the copper surfaces or the epoxy insulation off the windings. The commutator will also benefit from a quick polish with Solvol Autosol to remove built-up carbon.
 Picture five: A quick glance at the brush plate and the source of the problem becomes clear. Two carbon brushes run under spring pressure against the commutator, one of which is permanently soldered to the plate. The brush on the old plate (top) is clearly heavily worn when compared to a new one (bottom).
Picture six: The other, non-captive, brush is a separate part, though the whole plot is supplied as one item when ordering spares. Again, the amount of wear is obvious when comparing the old brush to the new one. This brush is soldered to the mounting post for the live feed cable, and has to be mounted into the end cover before assembly.
Picture seven: With the armature replaced in the body, this is how the brushes engage against the commutator. Spiral springs hold them under tension, and these will have to be held back while the brush plate is positioned. A notch in the plate lines it up correctly to the body. The end cap then sandwiches the assembly together, and the two long screws go back in from the other end to hold the starter together.
 Picture eight: Bench testing the rebuilt motor. I've clamped it into the vice to hold it steady, then positioned a bike battery so the negative terminal is in firm contact with the end cap, to provide a good earth. Now touching the lead from the motor terminal to battery positive completes the circuit, and the motor should spin.
Picture nine: The rebuilt motor goes back onto the crankcase. Some gentle waggling should engage it with the starter drive gear without having to remove the generator cover for additional access. The motor depends on a good electrical contact with the crankcase to complete its circuit, and the crankcase will have a heavy duty lead running direct to the battery negative to ensure a good earth for the starter motor. ![]()