For step-by-step photos and captions, visit the image gallery.
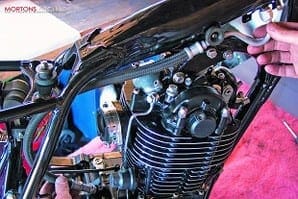
Picture one: Now the real fun can begin. The XT engine is a fairly light and manageable lump compared to some, but I still find it easiest to lay it on its right side and offer the frame up to it. The traditional pink fluffy blanket on the workbench prevents scratching and damage to all those lovely shiny parts. A little gentle wiggling gets the frame in position, then the engine bolts can go in to hold it all together. Note the rear brake pedal pivot, which I've also fitted at this stage.
Enjoy more Classic Motorcycle Mechanics Magazine reading every month.
Click here to subscribe & save.
Picture two: With the bike still light enough to flip over on its side, I'm fitting the oil feed pipe, which delivers oil from the frame downtube to the oil pump in the crankcase. Not wishing to strip the pipe for re-plating I admit to having simply cleaned up the metal sections and painted them with VHT silver, hopefully no one will notice! The pipe screws on to the filter gauze at the front end, and secures with two screws to the crankcase above the gearbox sprocket, with a new O-ring fitted at the flange.
Picture three: Up at the top end this is the oil return pipe, which sends oil from the pump back to the frame reservoir. Again I've used silver paint to clean up the ends. Don't tell anyone. Note the head steady brackets that secure the cylinder head to the frame, and the circular rubber damper rubber for the fuel tank. This damper rubber also secures a clip that holds the pipe in position. Again, a new O-ring goes in at the pipe flange on the crankcase.
Picture four: With the motor bolted up tight and oil pipes fitted I'm now refitting the carb. This has not only been stripped and cleaned, I've fitted a Keyster repair kit from NRP and had the carb body vapour blasted. The float chamber and mixing chamber top have been polished up and the bracketry for the cables and odd bits of fittings and linkages have all been re-plated in bright zinc. Stainless screws from Inox finish it off, and frankly it now looks rather too nice to just bolt on to a motorbike. Still, it will have to work for a living from now on.
 Picture five: Next, the airbox assembly. Being made of plastic this has simply required a good scrubbing and a spray with silicone polish before replacement. The oil separator (the circular chamber mounted on top of the crankcase) engages with a stub on the bottom of the airbox. I've omitted to have the clip around the separator re-finished, so I'll remove it later and pop it in for zinc plating before the bike is ready to emerge into the outside world. You always forget something, eh?
Picture six: Round the other side, the battery tray clips in and bolts up next. A couple of electrical components are mounted to it, the whole thing being rubber mounted and therefore isolated from engine vibration. The upper component is the winker relay, the lower one is the rectifier for the charging circuit. The electrical terminals are all colour coded or terminated with plastic plug-in block connectors, so it's impossible to get the connections mixed up.
Picture seven: Before leaving the midships of the bike, I'm checking the air filter. This is of the oiled foam variety, and should be cleaned out in solvent, wrung dry, and then wet with engine oil at every major service. It's never necessary to replace it unless it has become damaged. This one was pretty grubby, so I've cleaned and re-oiled it before putting it back in.
Picture eight: Philpotts have done a superb job of refinishing the fork stanchions, which were quite badly pitted. Assembly of the forks should be quite straightforward, but I've laid out all the components for each leg before starting. Between the stanchion and the slider is the main fork spring and internal damper assembly, at the lower end of the stanchion are the internal shuttle valve parts, which fit inside the stanchion and are secured by the circlip. I photographed everything as it came apart, so I can simply refit it all the same way now.
 Picture nine: Of course, the forks will require new seals fitting, so before commencing reassembly I'm removing the old seals from the tops of the sliders. There's a washer and circlip to come out first, then I've tapped a screwdriver down between the oil seal and its housing to release it and pry it free. It's important not to damage the slider this way, but I've found on older bikes where some corrosion has built up (as here) it's the only way to get the old seals out. With care, the sliders won't be damaged.
Picture 10: There wasn't much to re-chrome on the XT, but Quality Chrome of Hull have done a great job with the small detail parts that needed attention. The shock absorber adjuster rings have come up well, as has the rear brake lever. The two screws are for the right-hand side panel and the tool box lid opposite the silencer, and need refitting to their respective rubber collars with new split pins. For some strange reason our bike came with one chromed chain adjuster (which was in good nick), and one with a zinc finish. I've had the zinc one refinished in chrome to match the adjuster on the other side.
Picture 11: Before the wiring harness goes back on the bike, I've stripped back the taped insulation and checked for any damage. This is the time to repair any dodgy sections of wiring and make sure that all the block connectors and earth terminals are in good nick. When I'm satisfied that it’s all healthy I can re-tape it all with black insulating tape. Offering the harness up to the bike, using the strip-down pictures as reference, I can begin to connect up the terminals and make sure that it's all routed correctly before bolting on too many bits to get at it later. Clean off the powder coating from any frame earth points to make sure the electrics will work correctly.
 Picture 12: I've reassembled the shockers, so can now rebuild the rear suspension. The swingarm has had new bushes tapped in, then I can waggle it into the back of the frame and refit the pivot bolt. Phil Denton Engineering have made up a set of spindles and pivot bolts for the bike, and the new bolt looks superb against the powder coated frame. Phil also supplied replica M10 bolts in stainless steel for both top and bottom shock mountings, perfect replicas of the dished-head originals.
Picture 13: Up at the front end, I'm rebuilding the steering head bearings before refitting the yokes. I tend to favour aftermarket taper roller bearings for most rebuilds, but the XT’s bearings looked new when I removed them, so I'm taking the unusual step of reusing them. I'd consider taper rollers a must for any heavyweight Jap bike with performance potential, such as a Z1 or Suzuki Kettle, but the XT is a much lighter and more nimble beast, which is unlikely to ever be pushed into high-speed wobble territory. I am fitting new balls, though, and have filled the bearing races with grease to hold them securely in place. If ever in doubt about how many balls to fit to a headrace, always leave space for a single ball rather than pack them in tight.
Picture 14: I've assembled the bottom yoke into the head bearings and set the bearing preload to zero before sliding the rebuilt fork yokes upwards through the yoke and clamping them home. Head bearings should always be adjusted with no preload, ie free to turn but with no back and forth movement at the forks, but in my experience they always settle slightly once the bike is on its wheels. I'll be checking the adjustment again once the bike has completed its initial test run. Now the top yoke, complete with handlebar clamps, taps downwards over the steering stem and stanchion tops and I can clamp it down with another of Phil Denton’s superb replica stainless top nuts.
 Picture 15: Then the front wheel goes in. I decided when stripping the bike that the front wheel was quite presentable and didn't need stripping for refinishing. It was all part of a strategy to avoid falling into the trap of spending far too much money on a full-on restoration, but now it looks a bit tatty. I'll be giving it a thorough clean and polish before the bike emerges out of the shed; that front rim should scrub up well with bit of elbow grease. Another Phil Denton spindle replaces the rusty original.
Picture 16: The winkers and headlamp on the XT are of the quick release type, intended for rapid removal for off-road use. These two headlamp brackets clamp around each fork leg on rubber cushions, and are each secured with two M6 screws. It's possible to fit these the wrong way round, and I've seen them upside down on several XTs – reference to old magazine articles and my own strip-down photos confirms they are fitted correctly. Note the clock assembly, now bolted up to the underside of the top yoke.
Picture 17: The VHT paint I sprayed onto the refurbished silencer has now had time to cure, so back it goes onto the bike. This should really go on before the right-hand shocker, which I've had to remove again to fit it. The silencer assembly has three rubber mounted mounting points, two on the frame downtube and one at the upper right. I've slotted a screwdriver through one of the rubber bobbins to support the weight of the silencer while I fit and tighten the mounting bolts. The two heat shields have been powder coated, and are then refitted with new, short M6 pan-head screws.
Picture 18: Exhaust front pipes on trail bikes are always a problem. In my experience no amount of time, attention and VHT black will ever produce a lasting satin black finish, and the pipe begins to show surface rust as soon as the bike is wheeled out of the garage. I once even tried the drastic measure of having a brand new header pipe for my SP400 chromed before spraying it in VHT satin black – it was rusty within three months. Now modern coatings have finally arrived to help solve the problem. This original XT pipe has been ceramic coated in a process similar to that used on Formula One racing cars, and should now withstand the worst abuse and still look good.
Picture 19: Over to Toxic Crow now, where ace painter Martyn Holt is putting the finishing touches to the new paintwork. The tank has been stripped and blasted, and was found to have a dent in the left side, which Martyn has filled and re-profiled. Sunrise Graphics provided the new decals, which Martyn has applied over the correct white base coat and then lacquered over, to give a glossy and durable finish. Final polishing of the lacquer is performed by this air-driven buffing wheel. I'm also taking the precaution of epoxy coating the inside of the fuel tank before putting the bike back into service. Don't want any old bits of rust or paint finding their way into my lovely rebuilt carburettor!
 Picture 20: Toxic Crow have also painted the steel section of the rear mudguard ('rear fender rear', for lovers of translated Japanese part books). The other coloured parts are self-coloured moulded plastic, and need no other refinishing than a good clean up and a hint of polish, though I have replaced both side cover decals with new ones from Sunrise Graphics. With the rear fender in place I can now bolt up the rear winkers to their mountings on the frame. To ensure a good earth I'm also adding extra earth connections to the main winker nuts – Kawasaki Z1 parts also fit the XT perfectly.
Picture 21: This bike came with the wrong tail-light, and I've succumbed to the temptations of eBay to find this correct NOS round lamp. It looks much better, but the tail-light mounting is still the wrong type, lacking the two vertically mounted round reflectors that were such an XT trademark. I'll keep looking. This bike is also lacking a grab-strap for the seat, and the front mudguard is the wrong one too, being obviously donated from a later leading axle model. Still some details to work out, then, but for now I can declare assembly finished, and wheel the bike out into the sunshine for the restarting ceremony. ![]()