Our Yamaha engine wasn’t in bad overall condition, as we discovered in part one. A full strip of the engine revealed no major problems, only the front camchain slipper blade being in need of replacement.
I’ve had the head and barrels bead blasted and we’ve opted to replace the camchain. So, armed with a gasket set and a full set of replacement oil seals I’m now ready to rebuild the engine. For step-by-step imagery view the image gallery
Enjoy more Classic Motorcycle Mechanics Magazine reading every month.
Click here to subscribe & save.
Picture one: The roller bearings fitted to the main and big ends are more or less bulletproof unless a major lubrication failure has occurred. The crank has shown no signs of distress so I’m happy about re-fitting it. The starter drive gear, indicated, shows some signs of wear but this is not excessive.
Picture two: Before assembling the crankcases I start by re-fitting the starter crossover shaft and its drive gears. This can be really difficult to engage later, as I discovered during the engine strip.
 Picture three: The gear selectors also need to be assembled into the top crankcase half at this stage. I’ve been careful to keep the three selector forks in order and can simply slip them over the selector drum as I slide it into the crankcase. Each selector fork then needs its respective pin sliding into place until it engages with the track on the selector drum. Then I slide a cotter pin into place and bend the ears over to secure the pin.
Picture four: This cross shaft also serves to locate the three selector forks in the correct position. There’s a fair amount of movement in the selector forks with everything correctly engaged. This undoubtedly helps gear selection but is also probably responsible for the traditional Yamaha ‘clunky’ gearbox.
Picture five: Now I can position the crankshaft and the two gearbox shafts into position in the upper crankcase half. I’ve placed new oil seals on each end of the crank and on the gearbox output shaft at this stage, and made sure the gearbox bearings are engaged with their respective locating rings in the crankcase. I’m fitting a new camchain too, so I’ve hooked it around the crankshaft.
Picture six: After applying a thin smear of Blue Hylomar to the jointing faces, I can now fit the crankcase halves together and refit and tighten the bolts. The workshop manual gives a tightening sequence but if in doubt I always tighten the bolts in a diagonal pattern working from the centre of the engine outwards.
Make sure the shafts rotate easily in their bearings before proceeding. The starter motor fits underneath the XS650 engine so I refit it now to save problems later. The starter reduction gears can then be fitted as an assembly to the left side of case.
 Picture seven: Turning the engine right way up, I can now lower the barrels into place after greasing and fitting a new base gasket and O-rings. Many people like to use ring compressors for this job but I prefer to gently ease each ring into the freshly oiled bore with the aid of a small screwdriver. Once all the rings are engaged the barrels should tap gently home with a rubber mallet.
Picture eight: With the barrels seated on the crankcase mouth I can fit the new front slipper blade into position and bolt it up with the two M6 bolts. The cylinder head then simply slides into place over the studs, having first made sure all dowels are in place, and I’m ready to refit the camshaft.
Picture nine: As with all engines, the valve timing needs to be spot-on and it’s worth taking time to check and double check the timing before progressing. I’ve started by temporarily refitting the generator stator which allows me to accurately line up the ‘T’ mark, ensuring the engine is at top dead centre.
Picture 10: The camshaft now drops into place in the head and I’ve rotated it to line up this punchmark with the cylinder head flange. This will index the timing correctly. The new camchain is wrapped around the sprocket and temporarily retained with a loop of electrical wire to stop it dropping into the engine while I double check the timing marks.
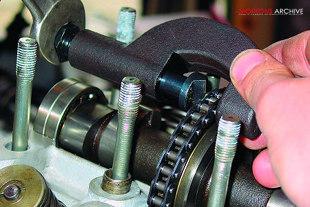 Picture 11: Riveting up the soft link into the new camchain is a delicate job as it’s easy to drop the link or its end plate down into the engine. It’s possible to buy a special tool for riveting up the link but I’ve always got satisfactory results using a nut splitter like this.
Picture 12: With the camchain tensioner refitted to the rear of the cylinder block I can now tension up the chain. On this design the threaded sleeve winds down around the plunger until the plunger end is flush with the housing. This correctly pre-loads the tensioner spring. The new camchain was quite a tight fit so I’ve set the tensioner up with almost zero pre-load for the time being. It will need checking once the engine has run.
Picture 13: Next, the rocker cover. I’ve already refitted the rocker arms but these four sleeves need to be pressed into place with new O-rings before fitting the cover. The sleeves and O-rings will prevent oil leaking out past the head bolts. A thin smear of Blue Hylomar will seal the rocker cover to the cylinder head.
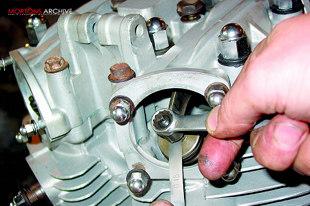 Picture 14: This is a convenient time to set the valve clearances. These could close up slightly once the engine has started up so I’m setting them slightly wide. I’ll be re-checking them once the bike has run after the rebuild.
Picture 15: All that’s left to assemble on the top end are the ignition components. With the points and auto-advance housings re-fitted to the head with new gaskets and oil seals, I can lightly grease the crossover shaft and slide it through the camshaft.
Picture 16: The auto-advance unit fits on to the right hand side of the crossover shaft. The easiest way is to locate the baseplate first and clamp it up with its locknut. The centre boss then slides into place before engaging the bobweights and tightening the centre nut. Each bobweight is retained by a tiny circlip which needs to be carefully clipped into place.
Picture 17: On the other side of the head I can now refit the points backplate. Before removing it I took the precaution of scribing a reference mark on the housing face. Now I can simply line up my reference marks and clamp up the screws. I’ll be checking the ignition timing with a strobe once the engine is running to make sure it’s spot on.
 Picture 18: Now for the clutch and primary drive. I’ve opted to start by sliding the starter bendix assembly onto its shaft. The whole starter clutch mechanism is unusual on the XS650 – the starter motor drives a set of reduction gears on the left side just beneath the gearbox sprocket. Drive is then transferred to this bendix assembly via a crossover shaft. A rather convoluted system which suggests that the electric starter was adapted to fit an engine originally designed for a kickstarter only.
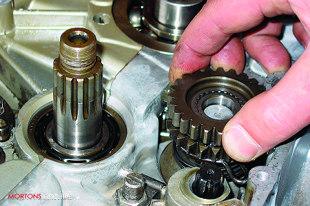
Picture 19: Next I’m refitting the detent roller to the end of the gear selector drum. This clicks the selectors into their correct position when changing gear. Make sure the return spring is in good condition and correctly engaged.
Picture 20: The gear selector shaft can now be fitted. The shaft slides right though the crankcase, the selector claw engaging with the pins on the end of the selector drum. I’ve taken the precaution of fitting a new gear shaft oil seal into the left side of the crankcase first.
Picture 21: With the gear selectors in place the clutch can be rebuilt onto the input shaft. A washer and spacer slides on to the shaft first, followed by the clutch basket and inner drum. I’ve used a new locktab on the clutch centre nut to make sure it can’t loosen off later.
Before the clutch plates go back in I’ve done a quick check for worn or buckled plates. Then with the clutch pressure plate fitted the primary drive and oil pump drive gears can be refitted to the crankshaft.
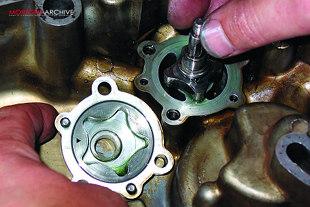 Picture 22: The oil pump assembles into the inside of the outer clutch casing. I’m taking the precaution of priming the pump with lots of fresh engine oil to give the lubrication system a hand when the engine is started for the first time.
Picture 23: After refitting the oil pump drive gear the tacho drive shaft slides downwards into the clutch casing to engage with its worm drive. The tacho drive boss, with a new oil seal fitted, slides over the shaft and into place in the casing, and is then secured with its lock screw.
Picture 24: After greasing and fitting a new gasket the clutch case then goes back on the right hand side of the motor.
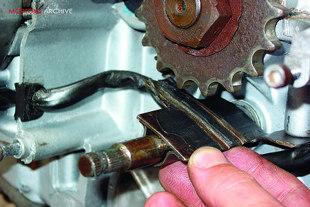 Picture 25: Finally, before refitting the engine in the frame, this rubber-faced guide plate clamps in place around the gearchange shaft. This not only protects the shaft itself, it also stops the drive chain cutting into the alternator wiring. The rubber facing on this guide plate is quite heavily worn but is still serviceable.
We were now ready to fit the rebuilt motor into the frame. However, the owner is so pleased with the condition of his engine that he’s considering a full restoration of the chassis as well…
The next step is to get the frame powder coated, then we’ll be looking at some rechroming and new paint as funds become available. See part one
I’ve a feeling this could turn into an extended project so I’ll keep you posted on developments as work proceeds. In the meantime the engine will be kept safe, dry and warm in the owner's living room. ![]()