We've departed from the magazine's series slightly and joined the rebuild on reassembly, mainly because this was a seven parter in print. We've honed it to four.
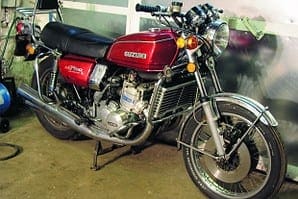
Our bike is a 1976 registered GT750A, engine no. 74465, frame no 81196, of which approximately 14,000 models were produced. The engine number and frame number sound original, as there is approximately 6400 to 6800 between them. The story goes that they sold a lot more engines than complete bikes.
Enjoy more Classic Motorcycle Mechanics Magazine reading every month.
Click here to subscribe & save.
The most common colours for the GT750A in the UK were Candy Gypsy Red No 3, Maui Blue Metallic, and Flake Orange No 2. The GT750A is probably the most common of all the Kettles and is probably the best all-round model produced. It is also the easiest to restore, parts are plentiful as long as you don’t want a new exhaust system…
Step-by-step images and captions can be viewed in the image gallery.
To view the other three parts in this overhaul, please subscribe.
View Suzuki GT750: part two
View Suzuki GT750: part three
View Suzuki GT750: part four
 Picture one: During dismantling I had a huge amount of trouble removing the barrels, as the cylinder studs were so badly corroded. Members of the Kettle Club came to the rescue with a special puller but, before the crankcases are sent out for shot blasting, we remove the old studs with a set of stilsons, intending to fit a new set later.
Picture two: While we’ve been struggling with the engine strip, Andy at Triple S has been busy beavering on the powder-coating job on the frame and cycle parts. With perfect timing, the engine parts can be sent out for blasting, boring and crank rebuilding, and I can turn my attention to starting to reassemble the cycle parts. Here I’m fitting new taper roller head bearings.
Picture three: If you’re having cycle parts powder coated, you must fit all new bearings to the headstock and swing arm as the originals simply won’t withstand the coating process. Before the new swing arm bearings are fitted, this centre spacer tube goes inside the swing arm pivot.
 Picture four: The swing arm bearings themselves are plain nylon bushes, which should simply tap into the ends of the swing arm pivot with a little gentle persuasion from a small rubber mallet. Again, be aware of the effects of the powder-coating process, which may have left a small ridge round the end of the tube. Be prepared to clean up the edge with a little abrasive paper to make sure the new bushes enter cleanly.
Picture five: The swing arm bushes are designed to pivot on these bobbins, one at each side. As this is the bearing surface, I’ve greased the bobbins well before sliding them into the bushes. When replacing worn bushes it’s as well to replace these bobbins, too, as they can suffer from water ingress and corrosion. They should butt up to the spacer tube fitted at step three.
Picture six: Finally these dust caps pop over the ends of the swing arm. Note the O-rings, which are designed to keep the grease inside the bearings and the water and dirt out. The whole assembly should be a snug fit into the main frame rails. Again, be prepared to clean off high spots from the powder-coating process if the swing arm is reluctant to go in.
 Picture seven: Once the swingarm is in, I’ve lightly greased the main pivot bolt and then slid it through from the right-hand side, nipping it up tight with the nut at the left. With everything bolted up solid, the swing arm should pivot freely but have no side-to-side movement. Now the shockers fit on their studs to complete the rear suspension assembly.
Picture eight: I’m preparing a few sub-assemblies next, ready to fit to the bike as the build proceeds. First off are the rear brake shoes. The originals were still quite serviceable so, with the brakeplate freshly polished and the pivot cam cleaned, greased and replaced, the shoes pop over the cam and pivot pin like this. I’ve cleaned them up in a solvent bath and then warm water first, but do beware of inhaling any brake dust. Some of it is quite nasty stuff, especially if you’re working on older bikes.
Picture nine: A bit out of sequence here but, as I’m seeing to the rear brake, it seems appropriate to sort out the front callipers, too. Triple S have powder coated the caliper bodies, so I’ve fitted new seals before sliding in the new caliper pistons. A smear of brake fluid on the seals and pistons makes them easy to fit.
 Picture 10: Right, back to the frame. I’ve always found it easier to fit the main stand before getting any further. It’s easier to do while the frame is light enough to manhandle on the bench and it’s going to come in very useful once the bike is ready to accept the wheels. The pivot bolts are the originals I’ve had zinc plated.
Picture 11: My old mate Paul Jackson has done his usual superb job of rebuilding the wheels with stainless spokes, and Doug at the local ATS has cast around to find some suitable period-style tyres after the Pirelli Phantoms that Roy originally wanted have proven unobtainable. I’m still waiting for the sprocket bolts, which are away being plated, but the wheel is going in for now.
Picture 12: With the back wheel in and the centre stand fitted, the bike can now sit upright on the bench while I concentrate on rebuilding the front end. The bottom yoke has also been powder coated to match the frame, but the taper roller bearings are after-market parts intended to replace the old cup and cone type, and improve the handling of the rebuilt bike.
 Picture 13: No excuses for flitting around between jobs here. I call it multi-tasking. While the kettle’s on (pardon the pun), I’m going back to the brake calipers so they’ll be ready later when I need them. The caliper halves assemble around the mounting plate, and must be free to move sideways on the two mounting bolts. Note the copious amounts of Copper Slip on the bolts to prevent them seizing. New rubber boots will be going on to hold it in. The new floating brake pads pop into the caliper mounting plates.
Picture 14: With the fixed brake pads secured into the back halves of the calipers, I can now assemble each caliper by bolting the two halves together. These bolts have been replated, too, and will have to be torqued up correctly once the calipers are assembled on the fork legs. I keep a whiteboard on the workshop wall so I can scribble large reminders to myself, or jobs like this could get overlooked. Wipe off the reminders when you’ve finished the job.
Picture15: Time for a little more reassembly, so I’ll have the new fasteners to hand. Inox have helped out again with a full set of fasteners, but I also took the precaution of measuring and listing all the fasteners as the bike came apart. That means I can order everything I need by size, just to guard against the inevitable specification changes from model to model. It’s a lot of work at the preparation stage, but it don’t half make life a lot easier from here on.
 Picture 16: The front wheel has also been respoked and fitted with a new tyre. Roy has taken the unusual step of opting for brand-new discs which, while it’s not a cheap option, saves me quite a bit of time and elbow grease in cleaning up the old ones. Fresh zinc plating on the front wheel spindle and spacers completes the cosmetics.
Picture 17: The front disc bolts are specials, so I’ve gone for the zinc plating option rather than stainless. The locktabs, too, have been zinc plated. On a bike as popular as the Kettle, things like disc locktabs will still be easily available new but, as the old ones were still serviceable, it was easy to include them in a job lot for zinc plating. If you’re working on a very rare bike, replating may be your only option, but make sure you use a plater who won’t lose anything.
Picture 18: Time for some more assembly work on the frame, and I’ve started by fitting the front part of the rear mudguard (rear fender front, as its called in the parts list). Just to help sort out the pile of rubber mountings and washers, I’m temporarily refitting the oil tank, too. Note the engine bolts and rubber bobbins I’ve put back into the engine mountings. A certain amount of time spent sorting through bolts and fittings like this avoids ever getting confronted with a pile of unidentifiable bits. When something obvious appears at the top of the pile, put it roughly where it’s going to go, and the bike will feel like it is building itself.
 Picture 19: Rear fender rear, now, and the grabrail. There are two different versions of the rear mudguard section, which are identical apart from the positions of the forward mounting bolts. Just as well, as a couple of sheared bolts in our bike’s frame had even the spark eroders beaten, and are still in there. This brand-new mudguard section has extra holes to mount it to the frame crosspiece, which neatly solves the problem.
Picture 20: Now for some more work on the front end. The steering lock bolts to the bottom yoke, and its going to be easier to fit it now rather than try to work in a confined space once the fork legs are in. Two Allen screws from Inox neatly replace the originals. Note the stainless pinch bolts, too, which will be polished later.
Picture 21: Before assembling the fork legs, I’m checking over the clocks and mounting hardware, as its sometimes easier to fit the bracketry early on. Roy has opted to fit not only new clocks, but also a new temperature gauge, meter bracket and clock lowers, the whole effect of which will be a completely new cockpit. Even the ignition switch is to be replaced by a new one.
 Picture 22: The fork legs have been stripped and cleaned, and seem to be quite serviceable. There are no bushes in the Kettle fork legs, so any play in the legs will mean new sliders or stanchions (or both) will be required. The sliders have been polished to a mirror finish by the lads at M&B Polishing, and I’m fitting new oil seals before reassembly to the stanchions.
Picture 23: The forks follow conventional design practice with an internal coil spring and damper. Once assembled, this Allen screw passes upwards through the slider to engage with an internal thread in the damper body. For now I’m nipping it up; I’ll tighten it fully once the fork legs are in the yokes – another note for the whiteboard. Don’t miss out the copper washers under the Allen screw heads, or fork oil will leak from the bottom of the sliders.
 Picture 24: At last, the fork legs can be slipped upwards into the bottom yoke. The height can be approximated for now, as I’ll line them up to the top yoke once I’ve fitted that. I always use a smear of anti corrosion grease inside the yokes for this job (Universal Aviation, the ACF-50 people, do an excellent one). This helps assembly and will prevent the bare metal yoke inner surfaces corroding to the stanchions, making subsequent dismantling much easier. And a final tip: if the fork legs are tight in the yoke, remove the pinch bolt and gently open up the slot with a large screwdriver while twisting the fork leg upwards through the yoke.
 ![]()