An average 1970s 250 weighs around 150 kilos and if we assume an approximate 50/50 weight distribution then the front steering races are coping with a 75kg load whenever the bike is off the stands. Factor in a rider and we’re looking at least another 35 kilos over the front end.
The top race doesn’t have to take much in the way of load as it’s really controlling lateral movement and supporting the bars, the rider’s arms and upper body. So our lower race will be coping with at least 110kg, on machined and greased annular steel tracks, separated by approximately 20 ball bearings and dollop of grease. Looking at the math behind our model here the numbers suggest that the balls in the lower race are collectively seeing a pressure of 360psi.
Enjoy more Classic Motorcycle Mechanics Magazine reading every month.
Click here to subscribe & save.
If that doesn’t make you think, nothing will. It took the Japanese a long time to realise the limits of cup and cone bearings and when you consider they were fitted to superbikes it kinda makes you wonder if anyone really had a grasp on the physics. That said the system works well and if maintained and adjusted they should, in theory, last the life of the bike.
During a full-on restoration it’s pretty much convention that the steering head bearings are replaced. For the cost involved (normally less than £30) it seems peevish in the extreme not to do the job properly. If the frame is to be repainted there’s going to be some blasting which will do the bearing surfaces no favours.
Step by step photographic instructions are in the image gallery.
Removal method
To replace steering head bearings (or inspect existing ones) we need to do some significant spannering. In this article I’m working on my MZ and although the front end is a little unusual the basic principles still apply. For clarity I’m also using a few Yamaha examples to illustrate certain points.
On 99% of bikes you will need to remove the entire front end of the bike. A few strategic squirts of ACF-50 or similar a few days beforehand makes the job much easier, especially in areas like the lower yoke pinch bolts that won’t have been loosened in years.
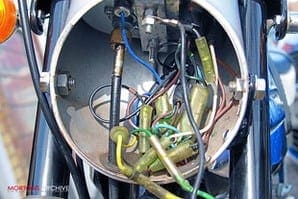
In most cases the wiring loom will need to be disconnected in the headlamp shell so take notes and pictures to make sure you know how it all goes back together; label if necessary (photo 1). Before removing the handlebars disconnect the brake or clutch cables. On hydraulic systems you need to figure out the best method of ensuring air doesn’t enter the system or factor in a fluid change as best practice.
 With the front wheel removed and the forks dropped out of the yokes we can finally get to the heart of the job. Loosen the steering stem nut (photo 2) and just slacken off the notched adjuster ring(s) below the top yoke (photo 3). Although you can use a bicycle type c-spanner, purpose-made adjustable units are infinitely more effective (photo 4). If you insist on slackening the adjuster ring with a hammer and punch you probably deserve the dented tank you will undoubtedly get.
The top yoke should now lift off the steering stem taper with the help of a couple of taps from a rubber mallet. Assuming the bearings will be reused it’d be handy to ensure all the balls are safely retained. A large sheet mounted below the front end acts as a catchall should any of the balls fall out (photo 5). Slacken the adjuster ring sufficiently to reveal the lower cup and remove all the balls with a magnetic probe, placing them in a magnetic tray. Occasionally some bikes use different sizes and/or number of bearings top and bottom so make notes and play safe.
Supporting the lower yoke remove the adjuster ring and upper race collecting the balls with the magnetic probe again (photo 6) then drop out the lower yoke on the steering stem.
Inspection and replacement
If any of the bearings look like this with dirty grease and/or rust (photo 7) they need replacing. Any signs of rust, pitting or corrosion mean the whole lot is scrap. There’s little sense in replacing one or two if the rest will need to be done in a year. Look carefully for evidence of webbing or pock-marking (photo 8) as this is evidence of corrosion. To remove the races in the headstock we need some brute force and intelligence, not ignorance.
 Working in a circular pattern, apply force equally to the entire circumference of the race driving it from its housing with a drift and a large hammer punching it on its inner edge; remember, the race is a very tight fit. The lower race is removed from the top and the upper from below (photo 9). If it proves impossible to get any purchase on the races beg, steal, borrow, or purchase a blind bearing puller, this should get the job sorted.
The cone fitted to the lower yoke is again an interference fit and needs to be carefully manoeuvred off its mount. Something thin and tapered such as a small cold chisel, a flat blade screwdriver or an old wood chisel normally does the job perfectly As the bottom yoke tends to see a lot of dirt and water the cone can sometimes corrosion weld itself to the steering stem and resist all attempts to remove it. In such circumstances a combination of penetrating oil, heat and repeated prying will normally release the culprit. If all else fails it’s possible (with extreme care) to use an angle grinder, tungsten-carbide tipped drill or a Dremel to slice through the seized-on cone to a point where it’s sufficiently weakened and can be levered off. However, it’s critical that this is done with precision to avoid any damage to the yoke, steering stem or the cone’s seat. On this occasion the race has actually cracked (photo 10).
Installing the new parts
As those incredibly helpful manuals used to say… replacement is the reverse of removal… yeah, right. Having washed out the housings with some degreaser and removed any corrosion with emery paper, the headstock races can be installed. As these are an interference fit we need as much help as possible and it pays dividends if you leave the races in a freezer overnight; even minor contraction makes the job easier.
With a race placed in the housing, tap it in evenly with a non-ferrous drift until it sits squarely in its housing (photo 11). It’s imperative the races are flush with the base of the housings if we’re to achieve good handling, so spend time making sure the races are flush and seated properly. Comparing the edge of the new race to the top of its housing will normally give a clear indication if it’s in on the wonk. Repeat the process on the lower mount and you’re halfway there.
 Fitting the cone to the lower yoke is slightly less tricky as access is obviously easier. In many instances it’s a real boon if you heat up the cone (somewhere between 80-1200C is a reasonable temperature but be careful you don’t burn yourself). Use a non-ferrous tubular drift such as this alloy scaffold pole (photo 12). This particular cone needed some serious percussion to settle it down, so don’t be afraid to give it some welly.
Using some good quality grease I can now stick the requisite number of ball bearings in place; I prefer to use something like ACF-50, with its well documented anti-corrosion properties, as this will protect the bearings for many years. The number of balls should be specified in the workshop manual; do not be tempted to use more than detailed, even if there is apparent space, as overstocking will seriously compromise operation. Having pushed the lower yoke and ball bearings home I secure the unit to the frame with some duct tape. This allows me to sort out the top end of the steering stem with more ball bearings and grease without worry that the bottom half will shoot all over the floor (photo 13); you only ever drop steering race balls onto a shed floor once… With the top cone in place, the adjuster ring is added and nipped up so that nothing can fall out.
 Adjusting the steering races
Now is the time to reinstall the forks, headlamp etc and once they are notionally in place you can adjust the steering races. This is done by nipping up the adjuster ring(s) until the front end is just feeling tight when the bars are turned and then backing off just a crack (photo 14). With the front end off the ground the bars should move through their arc freely but there must be no fore-and-aft movement at the steering head relative to the headstock when the forks are rocked back-and-forth.
When refitting the front end start by tightening at the handlebars and work down to the wheel spindle bouncing the bike (off stand) via the bars to ensure everything is settled and located. Check the brakes, plug in the loom and it should all feel factory fresh. Inspect and adjust after a few miles and the races should then last for years. ![]()