See step-by-step images in the gallery.
Image captions
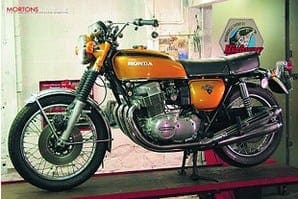
Picture one: The original wiring on this bike was in remarkably good condition, and I've had to do only a little cleaning up and retaping before refitting the harness. The major electrical components mount in the usual place to a plate on the left of the battery carrier. Our bike has been fitted with a replacement flasher relay (shown) that, while electrically correct, is a different shape from the cylindrical original. A judiciously placed zip tie secures it to the rubber mounting.
Enjoy more Classic Motorcycle Mechanics Magazine reading every month.
Click here to subscribe & save.
Picture two: Up above the engine, the ignition coils clamp back on the frame with new stainless bolts. The rear bracket has been zinc plated. The coils, mysteriously, looked brand-new when I stripped the bike so I haven't even had to clean them. Once in place, the colour-coded wiring from the contact breakers simply plugs in. Note the mounting bracket for the ignition switch at bottom left.
 Picture three: The clocks had already been reconditioned by Re-Dial UK, who did a splendid job. However, getting a good match for the original green faces proved difficult to achieve, so we'd agreed to settle for black faces instead. As the rebuild progressed and the bike began to evolve more closely to original showroom condition, though, we had a bit of a rethink, and decided it would be worth it to track down a specialist who could match the original colour. Eventually Peter Bond at the VJMC took on the job, and delivered the clocks completely rebuilt and refinished to original specs. He could have even zeroed the odometer, but we decided to keep the original mileage.
Picture four: The final step to complete the build is the paintwork, which has been receiving specialist attention from reclusive bike paint expert Alfie Noakes. Working in a specially built paint shop on his farm deep in the Vale of York, Alfie has managed to source the original candy paint to duplicate the original finish. This, it turns out, has been problematic. These bikes were originally painted by machine, which means the paint was applied with constant pressure at a constant distance. Repainting by hand requires a huge amount of skill, as any hesitancy or variation in the colour passes will result in an uneven finish. Don't let anyone tell you it's not possible, but the job has pushed hand-finishing to the limit and been hugely time-consuming. The results are stunning, but Alfie reckons he never wants to see another candy Honda paint job.
Picture five: The clocks on the K1 are retained in two chrome clips, secured to the top yoke with a single central screw. Each clip has a rubber ring to hold the clock secure and absorb vibration. With the warning lights refitted to the clock housings, there's a little wiring to do as the clock bodies are earthed with tiny screws and eyelet connectors. Finally the lower chrome trims are secured with the original tiny chrome screws.
 Picture six: There are some trims and emblems to fit back to the fuel tank, but the trickiest job is refitting the filler cap. This spring-loaded catch pivots on a bracket welded to the tank top, and it has to be engaged with its spring, then held in position while the retaining pin is tapped in from the side. And all without marking the fresh paint. Eventually, with the assistance of another pair of hands (thanks, Angie) the catch is fitted and the filler cap clicks shut.
Picture seven: At this stage, what started off as a makeover has almost inevitably mutated into a full restoration. Though the original silencers were in quite acceptable condition, Tim has decided that the quality of the rebuilt bike warrants a brand-new set of pipes, and a phone call to David Silvers results in a large carton of shiny silencers ready to bolt straight on.
Picture eight: The design of headlamp brackets is such that the fork legs have to be dropped out of the bottom yoke to fit them. Although I've already rebuilt the front end I knew this job was coming, and it’s not a big deal to quickly drop the wheel out and release each fork leg to put the brackets on. Note the chrome trim rings that secure the tops of the gaiters. Rebuilding the front end is straightforward, and this time I can finally tighten all the bolts and align the speedo drive.
 Picture nine: Inox Fasteners have delivered the polished stainless hose clips I ordered for the carbs last month, and it’s a simple enough job to pop them on and tighten the clips to secure the carbs. Note the choke lever at the top of the picture: this has been zinc plated to add the finishing touch to the left side of the bike.
Picture 10: Venhill have supplied a set of control cables to replace the frayed originals. This is the clutch cable. Locating into the front of the clutch housing, the nipple engages with the pivot lever that lifts the clutch. The coil spring holds it in the off position when not in use. With the cable located, I can adjust the clutch lifter with the central screw and locknut, then take excess slack out of the cable with the outboard adjuster.
 Picture 11: Although I plan to fit a Boyer Bransden electronic ignition kit, I'm going to start the bike up on the original points set-up. That way I can accurately static-time the ignition, and won't have to worry about strobing the engine when it has just started for the first time. I can then let it warm through gently and watch carefully for any leaks or suspicious rattles without being distracted by knowing the timing may be out. It also means any initial problems are likely to be from the carbs, and if need be I can tune them before starting to change the ignition system.
Picture 12: With fuel in the tank and the battery connected, the moment of truth finally comes. On half choke, the Honda fires up at the second attempt and settles into a fast idle on the bench. I let it warm though and check it over carefully for leaks, only finding a slight weep from one tappet cap. With everything pronounced sound, I can now remove the tank again and fit the ignition amplifier box for the Boyer kit. To clear the tank this has to go between the frame rails, and I follow Boyer’s advice to simply tape it in place with electrical tape.
Picture 13: At the business end I've removed the points backplate and taken both bobweights off the auto advance unit as per Boyer’s instructions. This ignition backplate now mounts on to the original three points’ backplate screws. The rotor should bolt on to the end of the crank in place of the points cam, but in this case the stud is too short to bolt it up. After a bit of head-scratching, I have to resort to grinding off the two lugs on the auto advance, visible here. I can't say I like butchering original parts like this, but it does provide a much more secure mounting for the ignition rotor.
 Picture 14: Boyer recommend setting the ignition adjustment to the mid position, then starting up the bike and strobing the timing. Now I know the bike will run easily I can set up the strobe before firing the engine up and setting the timing marks so they align at the full advance position with the engine revs at 3000rpm. The ignition should require no further maintainence.
I'm always a little nervous about taking a freshly-restored bike on the road for the first time, particularly when I don't own it. Tim has waited patiently for some time to see his pride and joy run again, and the last thing I want is to inadvertently scratch the new finish, or worse. However I can't announce myself satisfied with the rebuild until I've put a few test miles on the bike, and made sure everything works as it should.
My brief test ride reveals an engine that feels crisp and smooth and willing to rev, though in deference to the new pistons and bearings I'm watching the tacho like a hawk and keeping the revs below 4500. I'll be advising Tim to do the same for the first few hundred miles, then to give the bike a full service at 500 miles, just like a new one. This will allow everything to bed in and settle down, and minor adjustments to tappets and head bearings may be necessary.
The tyres and brakes are new, too, so I'm not going to be wellying the bike around too hard and exploring the limits of its handling. But there is a rather vintage feel to the steering, aided, no doubt, by the dated fork design and original rear shockers. Given a few miles to get used to, it will be fine, and all the work on the front brake has paid off with a powerful, responsive brake that will only improve as the new pads bed in.
All in all, a most satisfying maiden voyage, and Tim should enjoy the bike for many thousands of miles. ![]()