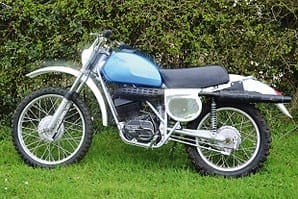
The first job is clean up all the engine parts for some cosmetic refinishing…
View the step-by-step instructions in the image gallery.
Enjoy more Classic Motorcycle Mechanics Magazine reading every month.
Click here to subscribe & save.
Image captions
Picture one: The most unpleasant part of any restoration is the hours of cleaning, scrubbing and degreasing to remove years of accumulated muck and grease. To take some of the drudgery out of the job I've put every part of the engine through the parts washer to degrease it, then washed it all off thoroughly with detergent and hot water. Small parts can be washed off in the kitchen sink (make sure her indoors is out for the afternoon first), but I've taken the crankcases outside to give them a thorough blasting with the jet washer.
Picture two: In the meantime I've had a call from Andy at Triple S to tell me the powder coating is ready so, with all the engine parts washed off and dried, I can jump in the car and go and collect the frame and cycle parts.
 Picture three: All the powder coating on this Honda has been refinished in gloss black. Alternative finishes and colours are available, and I've found the satin black option is spot-on for parts like engine covers and yokes on Yamaha LCs. It's even possible to powder coat engine castings and crankcases, but it's a time-consuming and expensive process.
Picture four: While out in the car I've called in to see Paul Jackson, wheel builder extraordinaire, and I'm delighted to find the wheels have already been rebuilt with lovely, shiny, stainless spokes. To make my day complete, Doug at the local ATS branch has done me an excellent deal on a pair of Conti Supertwin tyres which, although modern in design, have a period look that will go with the rest of the bike. It's a 10-minute job to put the tyres on the rims, and I have a complete set of wheels ready to go back on the bike.
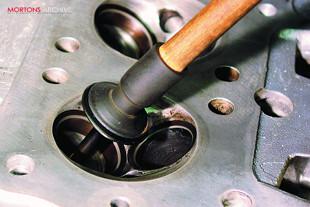
Picture five: Back to the engine. I always find cleaning up and regrinding valves a bit of drudge, so I'm going to get it over with. The first job is to remove the valves from the cylinder head, and it's here that I hit a minor snag. Some of the valves have developed burrs around the groove for the collets, which means they won't push down through the guides. It takes a few minutes’ careful dressing with a hand file before I can safely slide them out without damaging the guides.
Picture six: I've decoked the valves by offering them up to a spinning wire brush, making sure to keep them in order so they go back in their original positions. This early Honda has relatively soft valve seats, which means I can lap all the valves in using the traditional stick and rubber sucker method, smearing a little grinding paste on each valve seat then rotating the valve on the seat until I have an even dull grey ring around the valve and seat.
 Picture seven: There's one more job I have to farm out before I can think about rebuilding the engine, and that's this front engine bolt. You may remember I had to carefully cut through it with a hacksaw blade to get the engine out of the frame, and the remnants are stuck fast in the crankcase casting. So it's off to the Spark Eroders to get it shifted, and a quick call to John at Inox Fasteners to order up a replacement engine bolt in stainless steel.
Picture eight: On to the carbs now – may as well get them sorted and rebuilt while I'm waiting for the crankcases. Popping the float chambers off, the first thing I notice is the floats, which are made of soldered brass. This does look like old technology, and I'd expected to find more modern solid floats. These have been working OK and, as long as they are not allowing fuel to leak into the floats, affecting the shut-off level, they will be good for further service. If punctured, though, I'd replace them with more modern items.
Picture nine: The carbs comprise four separate units mounted on a common mounting plate, in usual Japanese fashion. To give them a good clean-up I'm separating them from the mounting plate, then stripping and cleaning each one individually. Note the choke linkages, which link across the carbs to a common lever on the left-hand side. This lever is very visible on the finished bike, so I'm adding that to the list of parts for bright zinc-plating.
 Picture 10: These carbs look to be in pretty good condition with no visible signs of varnishing. Each part goes through the parts washer and gets washed and dried before being blasted clean with compressed air. This should make sure all the airways and jets are clear before reassembly. I always work on one carb at a time on a nice, clear workspace to make sure no parts go astray.
Picture 11: The carb bodies have cleaned up pretty well, and a quick rub-over with Solvol Autosol on the float chambers and mixing chamber tops restores the original appearance. I've also polished up the mounting plate, throttle rotor and linkages. The slight oil mist that was evident from the back of the cylinder head has left a thin coating of oil on all of these parts, so degreasing is almost all that's required to make them look good again.
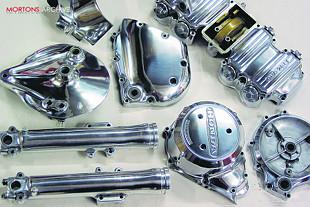
Picture 12: Another phone call, this time from the metal polishers, and it's off out in the car again to collect the engine covers and fork sliders. These really have scrubbed up well, and a relatively small cost has saved me hours of grubby work with a buffing wheel. There were no big gouges or scratches in the outer engine covers, which has made the job easy, as frequently polishers have to cope with removing light accident damage without spoiling the shape of original castings.
 Picture 13: Another tricky job, and one that I'm keen to get out of the way, is reassembling the handlebar switches. The switch halves have been powder coated, and replacing all the tiny levers, springs and ball bearings is a fiddly and time-consuming job. On the K1 the handlebar switch wiring is routed through the bars, too, and, as I'm fitting replacement UK spec bars, I've had to do some careful measuring and drilling of the bars before feeding the wiring through.
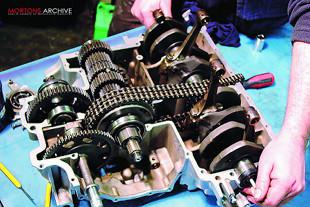
Picture 14: The spark eroders have got the seized stud out of the crankcase, so now for the most satisfying part of the job, putting it all back together. A fresh cup of coffee, Radio Four on the stereo and the phone off the hook, and I can lay all the engine components out on the bench ready for reassembly. Note the paper labels I stuck on the con rods earlier, to make sure they go back in the right order. To the left is the input shaft and intermediate gear shaft.
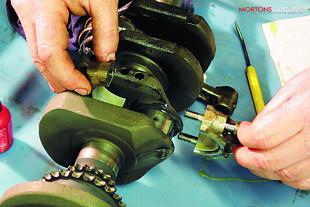
Picture 15: I'm starting the rebuild by assembling the rods on the crank with new big end shells. Checking the journals with a micrometer confirmed that there was negligible wear, and I'm rebuilding with black coded shells, the thickest of the standard options. As the engine may be standing for some time before the bike runs again, I'm using assembly lube instead of engine oil on all the bearing surfaces. This will provide plenty of protection for the new bearings on initial start-up.
 Picture 16: Before reassembling the crankcases, I'm assembling the gear selector forks and intermediate shaft into the lower crankcase half. The gear shaft assembly slides in from the left-hand side, and I marked up all three selector forks when I stripped the engine to make sure they go back in the correct order. Note that two of the forks engage with the intermediate gears, and the third sits upright to receive the input shaft.
Picture 17: The kick-starter assembly also fits into the lower crankcase half, and is retained by a split pin which presses downwards into the hole visible alongside the shaft. The kick-start return spring has to be tensioned at this stage, and I'm using a long-bladed screwdriver to wind the spring around and hook it into place. Note the gearbox output shaft, which is now in position at the rear right of the crankcase.
Picture 18: Now, at last, I can hook the new primary chains around the drive sprocket on the input shaft and over the crankshaft, and lower the whole assembly into the crankcase half. I haven't mentioned the primary chain tensioner, which must, of course, be in position first.
 Picture 19: After applying a thin smear of Blue Hylomar to the joint face, I've lowered the top crankcase half into place and wound in the upper crankcase bolts finger-tight before turning the whole assembly upside down and adding the remainder of the bolts. It feels unusual to work on the lower crankcase half first, as on most later Jap fours the crank and gear shafts are assembled into the upper crankcase half before fitting the lower to close up the bottom half. Now I can torque down all the crankcase bolts and make sure the shafts rotate correctly before proceeding.
Picture 20: Now for the top end. As there was a little wear evident on the bores I've taken no chances and opted for a rebore. Serco Engineering have carefully measured the new pistons and bored to suit, so the pistons come numbered to match the bores. This is the kind of precision engineering rarely found in shops used to reconditioning car engines. Here I'm carefully fitting the new rings before assembling the pistons to their respective con rods.
Picture 21: With the pistons assembled and fitted, the camchain tensioner roller is assembled around the new, endless camchain. This assembly has to locate into the two notches in the top of the crankcase mouth, with a small rubber block on each. The crankcases, barrels and cylinder head, incidentally, have been painted with VHT silver enamel to duplicate the original finish.
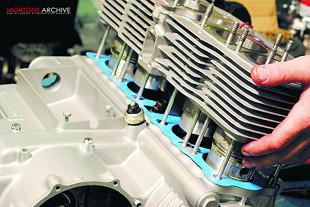 Picture 22: Fitting the barrels is frequently the most difficult part of rebuilding a four. I've found its easiest to position the engine at 2&3 TDC, then gently to engage the rings on the two centre pistons. Then lowering the barrel while simultaneously turning the engine will lift the two outer pistons to the bottom of their respective liners, and the outer rings can be gently engaged. I've lubricated the rings and bores with fresh engine oil first and, of course, fitted a new base gasket.
Picture 23: After making sure the engine turns over smoothly, I've fitted a new head gasket and fitted and torqued down the cylinder head. New rubber plugs fit over the holes to conceal the inner head bolts, and the cam carriers slide down over their retaining studs on the head. Note the tiny oil feed holes for the cam bearings (shown), which must have new O-rings fitted. I've used a slight smear of silicone gasket sealer on the O-rings to make sure of a good seal.
Picture 24: With a little assembly lube on the cam bearings, the camshaft hooks under the camchain and I can position the drive sprocket. Cam timing is simple enough; with the engine positioned at 1&4 TDC I can line up the timing marks on the sprocket to the cylinder head, then turn the camshaft by hand until the bolt holes line up. I always use a drop of blue Loctite on the cam sprocket bolts to make absolutely certain they don't come loose with the engine running.
 Picture 25: With the cam timing set, I've lubricated the bearing surfaces and bolted down the cam caps in their original positions. Finally, the rocker arms fit on the cam carrier castings and are retained by their pivot pins, which slide in from the outer faces. With everything fitted, I've set the clearances on all eight valves. This could be done later, but it's easier to do it before the cam cover goes on.
 ![]()