Unlike the smaller Sportster series, the Harley big twins are essentially a pre-unit design with entirely separate engine, gearbox and primary drive.
In that respect the layout of the power plant will be familiar to anyone who has worked on British bikes of the 1950s. However, Harley-Davidson do use top quality materials and engineering techniques and modern technology such as hydraulic tappets, electronic ignition and fuel injection on some late models.
Enjoy more Classic Motorcycle Mechanics Magazine reading every month.
Click here to subscribe & save.
I used a ‘98 1340cc Evolution-engined Dyna Glide for this step-by-step guide to the major service items. View the image gallery for sequential diy pictures.
Picture one: For the average service all you need is an oil filter, a pair of spark plugs and oils for the engine, transmission and primary case. I generally use genuine Harley parts and oils as they’re cheap enough and readily available. In this case I’m using an alternative engine oil supplied by Millers. This is good old fashioned 20W50 but has full range of modern additives.
Picture two: The first job is to drain off the old engine oil. Do this with the engine still warm from a run as it will flow better. The Dyna Glide has two drain plugs under the gearbox, the front one is for the engine oil.
Picture three: The drain plug has a magnet bonded to it which is designed to collect any tiny metallic particles. This can be wiped clean before replacing the plug.
Picture four: There are no tappets to adjust on the standard Harley engine but the hydraulic valve lifters do need a steady supply of clean engine oil. This small gauze screen should be removed and cleaned at each oil change to keep the lifters working properly.
Picture five: To get the old oil filter off the engine you may want to use a strap wrench. Alternatively you can follow my example here and bash an old screwdriver through the filter with a hammer. Then use the screwdriver to start unscrewing the filter off the engine. Crude, messy and effective.
Picture six: Before fitting the new filter, smear some fresh engine oil on to the rubber O-ring and then wind it on to the housing. Tighten the filter by hand. There’s no need to prime the new filter with oil on big twins.
Picture seven: I use a funnel and measuring jug to fill the oil tank with 2800cc of fresh oil. The oil level needs checking after the engine has run. Check it on the dipstick with the bike leant over on its prop-stand, not upright, and don’t be tempted to overfill as you can blow the filler plug out of the top of the tank.
Picture eight: Next, the transmission. The rear of the two drain plugs is for the gearbox oil. This plug is also magnetic and needs cleaning off before replacing.
Picture nine: The gearbox holds 473cc of transmission lubricant. Re-fill through the filler plug, then check the oil level on the dipstick with the bike held upright.
Picture 10: The primary case has its own lubricant, which can be drained off through this drain screw, also magnetic.
Picture 11: The primary chain can be adjusted through the inspection cover in the chaincase, but to get a clear look at it I’ve removed the chaincase outer. There should be ¾” of movement in the chain run with the engine cold. Turn the engine over by hand a few times to see if you have a tight spot on the chain and adjust it in that position. The adjuster is locked up with the single nut indicated. Slacken the nut, move the tensioner and re-tighten the nut.
Picture 12: With the chaincase bolted back up, 1000cc of lubricant can be added. This is a good time to adjust the clutch. Wind in the adjuster screw until it touches the pushrod, then back it off half a turn and nip up the locknut. Then replace the clutch inspection cover.
Picture 13: Plugs are cheap enough so I always fit a new set every service. They should be gapped to 1.0mm. Check the colour of the old plugs to make sure the engine isn’t running too rich or weak.
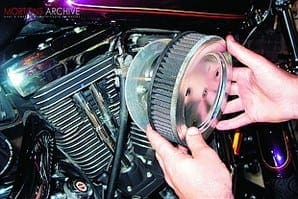
Picture 14: Check the air filter and clean it if in any doubt. This Screamin’ Eagle filter is made by K&N and can be washed out in paraffin, dried and re-oiled. I use genuine K&N filter oil applied sparingly.
Picture 15: To check brake pad wear the rear caliper unbolts and lifts clear. A smear of copper slip on the mounting bolts will keep the caliper operating smoothly and a similar smear on the back of each pad will stop the brake squealing.
Picture 16: Brake fluid levels will fall as the pads wear. Top up with DOT5 fluid as necessary. The rear master cylinder isn’t easy to get at and I’ve removed the front silencer mounting bracket to make space to remove the cap and check the fluid level.
Picture 17: At the front, the caliper unhooks off the disc after removing the two mounting bolts. Check for pad wear and copper slip the pins and the rear of the pads before re-assembling.
Picture 18: Remove the seat and check the battery terminals are tight and clean. A smear of Vaseline on each terminal will stop any corrosion. The battery is sealed for life and will not need topping up. Finally, check all the lights are operational, tyre pressures and belt tension, make sure all the cables operate smoothly and you’re sorted.