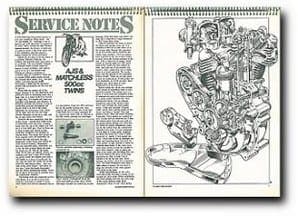
The following dissertation applies to AJS and matchless 500cc twins — the G9 and Model 20 — although it can in general and with discretion be applied to all AMC twins, except the later Norton engined models. As always, a modicum of common sense is the most useful tool in the workshop, and this article is biased toward the novice enthusiast.
Spares do not seem to be too much of a problem. Between Hamrax, Joe Francis, and Russells most parts seem to be available. The ever helpful Chopper at Hamrax seems to have found an answer to most problems, and seldom seems to be at a loss spares-wise. Pistons are always a problem; if available they are expensive. There are no minus .020in centre mains around, but Hamrax have minus .010, .030 and .040in. Likewise big-end shell. Personally, I think that the specialist dealers and autojumbles are the best bet for spares.
Enjoy more Classic Motorcycle Mechanics Magazine reading every month.
Click here to subscribe & save.
 Begin with the engine out of the frame, drained of oil, and degreased, and preferably held in something solid, like a large vice, or a stand made from dexion or angle iron. The engine will come out complete with magneto and dynamo. If, however, facilities are limited, it may be worthwhile partially dismantling the engine while it is still in the frame, especially the timing gear nuts, which can be tight, and also the two large chrome hexagons on the drive side, and the oil pipe banjo bolt bushes.
Remove the inlet manifolds, then the rocker boxes — usually four Allen bolts, or sometimes studs and nuts. Looking down onto the top of the engine you will see 8 x M6in BSF nuts. Four of these are in deep tunnels and require a long, preferably tempered, box spanner to remove them. The heads and barrels on these engines come off separately, so choose one side and undo the nuts diagonally. Under these nuts should be some thickish washers. Sometimes they are removed easily, sometimes not. If not, be sure to hook them out when the heads are off. Pull off the heads when all the nuts are undone. If they are stubborn and won't come off by hand, tap gently under the exhaust port with a soft mallet or a piece of hardwood. As you take the head off, watch out for the pushrods, and remove them — they are both of the same length — and place on one side. Clean the heads thoroughly, and dry before dismantling further. Clean out as much of the coke as possible from the combustion chamber.
The rocker arms are supported on two cast pillars. It is as well to have four separate containers in which to place each rocker arm with its attendant bits as it is dismantled. Undo the 2BA self-lock nut on the spindle locking bolt, then examine the screwdriver slot in the end of the shaft, for it is often damaged. If so, remove any burrs with an oilstone or fine file, before pushing out with finger pressure. Note that these cast pillars can snap off if subjected to rough treatment, so don't bang them about.
 Observe carefully the order in which the shims and springs come out. It is common to find one or two short, or in the wrong order. Repeat this operation on all four rocker shafts. Examine the rocker arms carefully. 1955-on rockers have a groove in the top of each rocker to carry oil to the friction surfaces of the arm. This is often full of sludge, which should be wire-brushed out. The valve ends of the rocker are also subject to wear, and light use of an oilstone will improve them, unless they are so badly worn as to need replacing. The rocker bears onto the spindle by two phosphor bronze bushes. These are an easy push in and out replacement. If lubrication has been neglected, or 20/50 oil used, these spindles may show signs of wear. Replacement is the only cure.
Before taking the valves out, arrange some means of correlating them to their respective heads. The easiest way is a piece of wood with four numbered holes, or alternatively mark with letter punches or a centre punch. Remove the valve springs and valves. Use an oilstone around the tops of the valves if they won't slide through the valve guides easily. Clean and examine. Original AMC valves were chrome plated on the stems, and have a "soapy" feel, and greyish colour. They are worth retaining if possible. Valve guides are located by wire circlips and are removed hot. Clean the carbon away from the port ends of the guides before drifting out. Now that the heads are totally dismantled, clean out all the carbon from the combustion chambers and ports. It is not necessary to bull them to a high shine.
 Examine the seats and recut (45°) only if badly pocketed; or, lightly, if new guides are fitted. Check that all the oil passages are clear, not forgetting those that feed the valve guides. A pipe cleaner is useful for cleaning these holes. If the valve faces have worn curved, it may be possible to have them refaced — that is unless the stem is too worn, and providing they can be trued without the metal at the edge becoming too thin; at least %sin is needed to be on the safe side. Most garages can reface valves for a nominal sum. The seats themselves may need a light reface to match. Do not omit to align the oil holes in the valve guides with those in the head.
When reassembling, oil the valve stem and guide, and wipe a smear of oil around the valve seats. When assembling the valve springs note that the wide edge of the spring bottom collar faces downwards. ![]()
NB For full text information, click on the 'view original article' link at the top of the right hand column.