Yamaha's XS250 and 400 twins are pretty solid pieces of kit, but aren't immune to the occasional catastrophe. Tina's XS250 had provided solid and reliable transport for nigh on 15 years, and though it had recently been nudged aside in the garage by a Harley Sportster she thought it deserved more than simply being left to gather dust. A previous engine swap had resulted in a holed crankcase, damaged while trying to remove a seized engine bolt. The replacement engine turned out to have a dodgy gearbox, and Tina had now acquired a third engine of unknown history. My task? To combine parts from the engines to produce one good runner, on a minimal budget
Captions
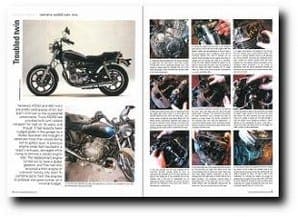
Picture one: I opted to strip the engine with the holed crankcase to begin with. This was said to have been in good running order prior to sustaining damage, and I was hoping to simply swap the internals into one of the other crankcases. A little cosmetic work will also make it look more presentable.
Enjoy more Classic Motorcycle Mechanics reading in the monthly magazine.
Click here to subscribe & save.
Picture two: Turning the engine over the hole in the casing is quite obvious. One of the front lower engine bolts had seized In place, and the application of force to free It off had succeeded only in breaking a chunk off the crankcase casting. This kind of damage can be repaired by alloy welding but the engine would have to stripped and the casing sent away to a specialist. Having two other engines available for spares it's far easier to simply swap the cases. The only drawback is that the engine and frame numbers will no longer match up, which could be an important consideration on a more collectable bike.
Picture three: To begin the stripdown I'm working on the top end first. The Yamaha uses a points ignition system with two sets of contact breakers driven off the left-hand end of the camshaft. Removing the rectangular points cover reveals the contact breaker plate and auto-advance unit. I've carefully marked the position of the backplate before removing it to aid timing on reassembly. With the points backplate removed the central bolt can be removed and the auto-advance lifted away and set aside.
 Picture four: Before removing the cam cover I've slackened off the four tappet caps. Then a total of 14 bolts have to be removed before the cam cover can be lifted away. I used a rubber mallet to break the seal before lifting it off. The XS250 follows conventional Japanese sohc design wisdom by carrying its camshaft in plain bearings in the head, with rockers pivoting on pins captive in the cam cover. I'll be stripping out the rockers later to check them for wear.
Picture five: The automatic camchain tensioner is mounted by two 6mm bolts, and bears onto the top of the rear slipper blade. A spring in the tensioner body pushes the blade downwards, and it tensions the chain by taking on a bowed shape. The ratchet mechanism in the tensioner body then locks the adjustment — a simple and effective design, which rarely gives trouble. With the tensioner removed both slipper blades can be unhooked and lifted clear.
Picture six: Now with plenty of slack in the camchain I can rotate the engine to gain access to the two short 6mm bolts that secure the drive sprocket onto the camshaft. These are Loctited in place, but It's easy enough to stop the engine from rotating by holding a 14mm spanner on the crankshaft bolt while undoing them. I always check the cam timing marks at this stage, and make a sketch to help with reassembly. Failing that, take a picture with a digital camera.
Picture seven: The cam sprocket will now drop sideways off Its mounting shoulder, leaving plenty of room to manoeuvre the camshaft out of the head. Note the oil seal on the timing end of the camshaft, this will be replaced with a new one on reassembly. As I'm stripping the engine completely I can let the camchain drop into the crankcase. But I'd be much more careful if this was just a top-end strip!
 Picture eight: Two 6mm bolts next to the spark plug holes need to be removed before the eight main 10mm dome nuts can be slackened off to remove the head. These nuts each have copper washers underneath to stop oil draining down the head studs, all which need to be in good condition. The workshop manual gives a slackening order for the head nuts, but if in doubt I always slacken them off diagonally starting with the outermost. Then the cylinder head just lifts away.
Picture nine: The barrels should now simply lift off, but of course any engine of this vintage has probably seen a few winters and salt corrosion around the cylinder base may make it reluctant to move. I've had to offer a little persuasion by inverting the engine and giving the cylinder block a couple of sharp cracks with a drift under the lower cylinder fin to break the seal. Be careful when doing this, as it's easy to damage the block, and avoid marking the gasket face as it comes free.
Picture 10: With the barrels put to one side I can remove the pistons by popping out the old circlips and sliding the gudgeon pins out of the small ends. I've marked the pistons inside their skirts as I'm hoping to reuse them, and I want to put them back in their correct bores. Note the sooty carbon deposits on the pistons. This may indicate a carburation problem — it looks as though the engine may have been running too rich, but the absence of any wet, oily deposits it bodes well for the condition of the piston rings and cylinder bores.
 Picture 11: Next, the starter motor. This engine has already had its generator cover removed, revealing the chain drive for the starter clutch. Two 6mm bolts hold the starter motor onto the top of the crankcase, and with these removed it simply waggles upwards and clear. At the same time the drive sprocket slides off the end of the starter, and the drive chain can be unhooked from around the rotor and stored away.
Picture 12: Turning the engine over I can now deal with the clutch and primary drive. Lifting off the clutch cover reveals a conventional wet clutch and gear primary drive with the oil pump mounted below It.
This is just a snapshot of the article. For the remaining captions and imagery, click on the download link. ![]()
Advert
 Enjoy more Classic Motorcycle Mechanics reading in the monthly magazine. Click here to subscribe.