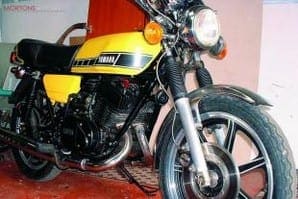
This 1976 Yamaha RD400C arrived last Christmas as a non-runner, missing a few bits and looking very rough. After some fettling over the next couple of months, it was fit enough to ride in the early spring. The engine seems to be a good ’un; running clean and pulling hard. After covering 1000 miles trouble-free, (well, apart from the bits that kept dropping off with the vibration!), the first serious problem had appeared with the clutch. I was unsure if the plates were slipping occasionally on acceleration, then it got heavier and heavier to operate, and was obviously getting worse.
I stripped the operating mechanism on the left side of the engine to find it quietly rusting away… all the grease had disappeared. All this bit consists of is a cable connection to a swivel mechanism that allows a small sideways movement to be exerted on a push rod. I sorted that out and put it all back together to find the clutch was still far too heavy. The clutch proper would have to come out. For step-by-step pictures and captions visit the image gallery.
Enjoy more Classic Motorcycle Mechanics reading in the monthly magazine.
Click here to subscribe & save.
Picture one: On the RD400 the clutch is on the right-hand side of the engine and is operated via a pushrod right through the engine. There is a ball bearing on each end of the clutch pushrod and, as these checked out OK, it was off with the right-hand casing after draining the oil from the gearbox. The casing will come off without taking the brake pedal off. First bit off is the kick-start, then the casing over the oil pump; just three screws here.
Picture 2: The oil pump can be left on the case so as not to disturb the settings, but the two pipes feeding oil to the carbs must be released so that the case can be withdrawn, after removing the nine screws holding it on, and tied out of the way (still fastened by the oil pump control cable).
Picture 3: Once the casing is off, the clutch is exposed and the six 10mm bolts can be released evenly to allow the springs behind them to expand slowly. Once the bolts are out, the springs can be lifted free and the cover plate will come off.
 Picture 4: Underneath are seven friction plates and six plain plates separated by rubber rings (shock absorbers), and all these can be removed easily. The surrounding area and the clutch were remarkably free of gunge so it was a matter of measuring up the clutch components to check for any wear.
Picture 5: The friction plates have a wear limit of 2.7mm thick but should measure 3mm thick when new. These were exactly 3mm, indicating the bike had probably had a new clutch at some time before it went into storage. The springs were a different matter; the correct length should be 36.4mm but, in fact, they were down to the wear limit of 35.4mm – enough to allow the plates to start slipping under hard usage.
Picture 6: The plain metal plates were also in good condition, with no warping or wear marks as such, but they did have a machined cut-off on one side. The workshop manual makes no mention of this and various conversations with experts gave conflicting information. Some said they should be set to the pointer on the inner clutch drum; some said they should be spaced out much like piston ring gapping should be. I decided to space them evenly.
Picture 7: The next bit to check was the rubber rings that separate the plates. These were all intact but, while playing around with the clutch basket, I discovered that it had some movement on the shaft. Further investigation revealed a hand-tight centre nut AND the tab washer on the wrong way round! The other problem was the size of the nut – 29mm, not a standard size in the toolbox. I suspect that the last person to have the bike apart couldn’t tighten the nut up correctly because of this. This was obviously the cause of the horrendous clutch action.
 Picture 8: The centre clutch hub is connected to the drive side of the gearbox, which is connected to the engine drive sprocket when in gear. So, by holding the brake pedal down and locking the back wheel, and engaging a gear to lock the gearbox, the clutch nut can be tightened relatively easily… Do NOT try to wedge the clutch basket against the casing or mainshaft cogs… something will break!
Picture 9: So to reassembly. First off, the locking washer was put on the right way round with the tongue engaging correctly in the outer basket. Then the clutch centre nut was done up to a guestimate 40-odd ft-lb (in the absence of a torque figure in the manual). This is when the brake pedal effect comes in.
Picture 10: Peen the tab washer side up to the nut. Don’t forget the clutch mushroom: stick a bit of grease on it first and check that the ball bearing is still in the hole on the end of the push rod.
Picture 11: The plates can now be assembled in order according to the manual, not forgetting the rubber shock absorbers to separate the plain from the friction plates. The top plate can be put back on, the new springs inserted and the bolts tightened equally up to their stopping-point. I use a spot of Loctite on the threads.
 Picture 12: I ordered six clutch springs from the local dealer, expecting to pay through the nose, but I was pleasantly surprised to find they were reasonably priced. Reassembly of the outer case is easy but make sure that the gasket is intact or, better still, use a new one. I decided to use the old one as it was in good condition and looks very robust. At the moment there are no oil leaks apparent.
Put the kick-start back on, and don’t forget the small oil pipes to the carbs! Check the oil pump settings have not moved after juggling the cable back into its housing and, if you have any doubt, bleed the oil pump to ensure there is no shortage of oil when you fire it up. That should be it: smooth clutch action and easier to ride in traffic. Enjoy! ![]()
Advert
 Enjoy more Classic Motorcycle Mechanics reading in the monthly magazine. Click here to subscribe.