Last month I managed to get Jason’s GS750 engine stripped down despite 25 years worth of accumulated muck, grease and barrels which were heavily corroded onto the cylinder studs. Now with all the bits and pieces thoroughly degreased and cleaned off I can lay everything out on the bench and take a good look to see what I’ll need for the rebuild.
For step-by-step imagery and captions, visit the image gallery.
Enjoy more Classic Motorcycle Mechanics reading in the monthly magazine.
Click here to subscribe & save.
Captions
Picture one: The first major problem to contend with was the seven exhaust bolts which had corroded so badly into the front of the head that I had no option but to shear them off during the stripdown. My mate Martyn Adams at Serco Engineering finally managed to get the remnants of the old bolts out of the head but each required careful drilling out to remove it. Here I’m running an M8 tap down each of the holes to clean them out. We think that someone had used unplated low tensile bolts to secure the bikes aftermarket exhaust system. Moral? Use high tensile or stainless bolts, and make sure they have plenty copper grease on the threads.
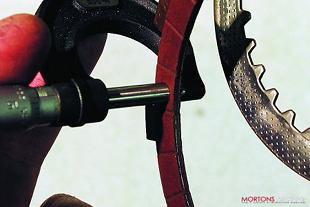
Picture two: All the valves and seats show signs of pitting on this engine but fortunately it’s not too deep and can be removed by lapping in the valves with grinding paste. However lapping in the valves on any DOHC engine inevitably means the valve clearance shims will need replacing when the engine is rebuilt, and to make sure I stay within the available shim sizes it’s important I don’t take too much metal off the valves. A quick twirl with the grinding stick clearly shows up the pitting here, and I’ll continue to gently lap each valve in until the pitting has just been ground off and each valve face shows an unbroken grey line all the way round.
Picture three: Before refitting each valve into its original position the valve guides need to have new stem seals fitted. The GS stem seals are quite a tight fit on the guides and can be tricky to remove. I’ve found the best way is to carefully split the seal body with a hammer and small chisel, being careful not to damage the guide. I’m always careful doing this on GS engines as some years ago I remember struggling so hard to pull a seal off with pliers I actually succeeded in snapping off the top of the valve guide! The new seals simply pop on to the guides, a quick squirt of WD40 helps them go on easily.
 Picture four: The GS engines follow the conventional practice of using two concentric valve springs on each valve. The springs seat onto a steel collar around the guide, which incidentally must be in place before you fit the stem seals. Once the springs are in place this top collar goes on, and I can then use a valve spring compressor to wind the collar down onto the springs, allowing me to pop the two retaining colletts onto each valve stem.
Picture five: If you’ve wondered about the term “bucket and shim cam followers” this is what one looks like. Like the Kawasaki Z1 (from which it drew design inspiration), the GS Suzuki has cylindrical cam followers which slide right over the valve springs and sit in large diameter drillings in the head. It’s a great design which transmits loads squarely to the tops of the valves, rendering valve guide wear to the history books. Each follower has a recess at the top to accept a shim, allowing adjustment of the valve clearance. I’m giving each bucket a good smear of engine oil before it goes in. This will give it some lubrication for the first few minutes when the engine is started up, before the oil has had time to circulate.
Picture six: Next, the barrels and pistons. Jason reported signs of smoking from No.1 cylinder but the bores look fine, and careful checking of the ring gaps show them to be within factory tolerances. The ring gaps should measure 0.15 – 0.35mm, with a service limit of 0.70mm. These rings do show signs of wear, but are all within the 0.70mm limit. With an unlimited budget I’d fit new rings, but they aren’t cheap on these engines and the problem could well have been down to hardened valve stem seals allowing oil to travel down the guides. On balance I’m going to re-use these.
Picture seven: Jason’s cylinder barrel fins are in pretty good condition despite the hammering I had to give them to get them off when I stripped the engine. By chance, or some cosmic arrangement of the planets, I also have another GS750 engine belonging to Colin in my workshop, also for a full rebuild. With the custom project GS750 I’m also building my workshop is beginning to resemble GS750 heaven! Colin’s barrels have had a harder life and have lost part of a fin. This damage can be repaired by careful alloy welding provided we have the broken bit of fin. Unfortunately Colin lost it, but I have a set of scrap GS barrels in the bin which have donated this piece of fin, carefully cut and shaped with an angle grinder to fit.
Picture eight: After some cajoling and crossing the odd palm with silver, my old mate Terry has come through with this superb welding job to restore the missing fin. Both Jason’s and Colin’s GS750 engines are being sprayed silver to match the original factory finish, so this repair will be almost invisible on the finished bike.
 Picture nine: Last month I mentioned how difficult it could sometimes be to get barrels off corroded crankcase studs. Just to show what can happen, these are the barrels from Colin’s spare GS750 engine, bought as a donor for parts. Colin had such a struggle he had to choose to save either the barrels or crankcase when stripping the motor. Wisely he chose the crankcase, but it’s still a shame to see another set of irreplaceable barrels heading for the scrap bin.
Picture 10: Back to the plot, and Jason’s barrels receive the attentions of the glaze buster. This roughens up the bores without removing too much metal, and will give a better surface for the rings to run against. It also takes off any carbon deposits which may have built up a ridge around the top of each cylinder. Glazed bores can prevent the rings sealing properly even when they’re in good condition.
Picture 11: On the top crankcase half this cylinder stud hole was also suffering from the effects of corrosion. Removing the stud revealed two tiny cracks, and careful attention with the welder ensures the engine won’t weep oil from this area later. Without specialist milling equipment it takes time and care to dress up the gasket surface with hand files before cleaning up the thread with a tap and fitting a new stud. A good smear with silicone gasket sealant may have effected an adequate repair, but this takes the guesswork out of it and makes the repair a good and permanent one.
Picture 12: The crankshaft assemblies on Suzuki’s GS engines are remarkably sturdy devices and withstand huge mileages. They can be stripped and reconditioned if necessary, but as long as the bearings show no signs of distress I’m confident enough to re-use the crank. A close visual inspection of each main bearing will reveal any signs of heat discolouration on the rollers, which would indicate bearing problems. As this type of crankshaft is a pressed-up assembly any top end seizures can skew the crankpins out of true, which is why engines used for drag racing have their crankpins welded in place. This is not necessary on road bikes and, in fact, prevents the crank being stripped for reconditioning if its ever needed.
 Picture 13: Jason told me he had experienced problems with the bike jumping out of gear, and a close examination of the gear selector dogs soon indicates the source of the problem. The gears slide into engagement with their neighbours, and any wear or rounding of the engagement dogs will mean they can slip apart under load. Sure enough Jason’s gearbox has one badly worn set of dogs, so I’m stripping the gears off the output shaft to get to the offenders. The gears are retained on the shafts by a selection of shims and circlips. Clamping the gear shaft upright in the vice then removing each component and laying it out in sequence means I can reassemble it all in the same order.
Picture 14: Here’s the main offender. Years of hard use has worn the edge off this dog, and hard load on the gear will now tend to spit the gear sideways and out of engagement. One advantage of having a workshop full of GS750s is that I can dig around in my box of spares and find a better pair of gears; new replacements will be very expensive if they’re still available at all. The replacements show the beginnings of wear in the same place so its obviously a common fault on high mileage GS’s, but they should provide many thousands of miles service and may well last the life of the bike.
Picture 15: It’s worth checking the selector forks for wear or damage, particularly when there’s a known gear selector fault. As the bike jumps out of gear it will push the selector fork sideways. Usually this will simply travel safely along the selector drum, but scoring or blueing here will tell me if the fork itself has sustained damage. This one looks fine.
Picture 16: Component parts of the clutch. The GS750 clutch is immensely strong and well designed, and for many years has been the first choice for specials builders wanting to improve the transmission on everything from Harley Sportsters to BSA Gold Stars. All that ever wears on these units is the plates and springs, which I’d consider consumables and would expect to replace every 20 – 30,000 miles. Note the huge needle roller bearing which supports the clutch basket and the flat needle race on the clutch lifter. Both should be checked for wear, but rarely if ever need replacement. Jason’s engine has heavy duty clutch springs which may make the clutch operation heavier but will never suffer from slipping.
 Picture 17: I always check friction plates for wear – these are almost new. The service limit is 2.4mm. The distinctive red colour confirms my suspicion that these plates are also aftermarket high performance replacements. The plain steel plates should be checked on a flat surface to show up any signs of warping and replaced if suspect – these are fine.
Picture 18: The one area which can show signs of wear on the GS clutch is these shock absorber springs built in to the rear of the clutch basket. The clutch basket is designed with some radial movement relative to the rivetted-on primary drive gear, and these springs control the movement and work as a transmission shock absorber. The rebound springs are fine, but all three compression springs are loose in their housings and will permit a little more than the ideal movement. In real life this rarely a problem, and as long as the springs aren’t broken I’m happy to re-use the clutch basket. This kind of problem is becoming more and more common on Japanese classics and I’m currently working on a reconditioning service for worn clutch baskets. At the moment I only have them in stock for the Z650, but the GS may be the next candidate for attention.
Picture 19: The starter clutch on these engines bolts to the back of the generator rotor so it can be easily serviced with the engine in the frame, and doesn’t require a crankcase split to get at as on some Japanese middleweights. Nonetheless I’m giving it a full check-over before pronouncing it fit for the rebuild. Starter clutches can have a hard life, but the only sign of distress on this one is the roller housing, which has become distorted in service and has obviously been rubbing against the back of the starter drive gear. This is not a major problem and I can true the pressed steel housing in a vice before rebuilding it, but if it had gone unnoticed it could eventually have worn through and led to starter clutch failure.
Picture 20: The starter clutch works by wedging three rollers against the boss on the drive gear. When heavily worn the boss and the rollers can wear flats, so the profiles begin to take on a “three-penny bit” appearance. When that happens the starter clutch can slip under load, so pressing the starter button results only in a frustrating whizzing sound from the starter motor and a freewheeling starter clutch. The GS starter drive gears are more robust than some, but I frequently fit a new set of rollers as a precaution anyway. However these rollers on Jason’s engine look to be in perfect condition, so they’re going back in.
Picture 21: Checking the cam journals for wear. There’s no signs of any scoring on the journals, but oddly there are signs of what looks like heat discolouration, rather unusual in this part of an engine. However everything measures up correctly and there’s no signs of any wear on the cam lobes. The cam bearings in the head also measure up OK, so I’ll have to scratch my head about the discolouration and pronounce these cams fit for further service. Maybe the engine has been run on an unusual oil grade?
Picture 22: The front camchain slipper blade is showing signs of age. The rubber facing can become brittle and can even break up, leaving bits of hardened rubber flying around inside the engine. Sure enough this one has a small chunk of rubber missing, and flexing the blade by hand reveals a telltale pattern of cracks across the rubber face. A trawl through the parts box turns up a much better replacement, so Jason gets a secondhand slipper blade. The rear slipper blade, incidentally, is a much sturdier device which doesn’t flex and is not so susceptible to wear. Still worth checking though.
 Picture 23: Camchain tensioners were the Achilles Heel of so many Japanese bikes of the 70’s and 80’s. If only all the manufacturers had followed Suzuki’s example and fitted big, solid devices like this. The GS tensioner is arguably the best camchain tensioner fitted to any classic Japanese engine. Quite simply it’s reliable and it works. The main plunger advances into the engine under spring pressure as the chain wears, taking up the slack as required. A secondary plunger moves across in the tensioner body, preventing the main plunger moving back and rattling. Kawasaki tried something similar, but made the mistake of trying to make it small and elegant. The big GS tensioner is over-engineered by comparison, and has the additional advantage of having an external thumbwheel arrangement on the secondary plunger, so even if it does stick in service you can reach under the carbs and give it a tweak to wake it up. Brilliant. No further attention required.
Picture 24: I always check the kickstarter mechanism for wear, but as these engines have electric starters the kickstart rarely requires any attention. This one is still like new.
Picture 25: You may have seen my comments about sump strainer gauzes in a couple of engine rebuild features now, but here’s a good example. The gauze on the right is from Jason’s engine, cleaned up and ready to re-fit. The one on the left is from Colin’s spare engine, just as it looked when I removed the sump. Old bits of gasket cement, dirt, sludge and bits of broken epoxy insulation from the generator rotor have been sucked up onto the gauze, which is now almost completely blocked. This is the main oil feed into the engine, and a gauze as blocked as this can severely restrict oil flow and even lead to oil starvation and engine damage. It’s also worth being aware that the oil filter is after the oil pump in the lubrication system, so any detritus getting through this gauze will go straight into the oil pump and can score the rotors, leading to a loss of oil pressure and a vicious circle of poor lubrication and rapid engine wear. In the words of Nick Ross, don’t have nightmares. But do drop your sump at major service intervals and make sure your filter gauze is cleaner than this one! ![]()
Advert
 Enjoy more Classic Motorcycle Mechanics reading in the monthly magazine. Click here to subscribe.