For my money, Italian motorcycles have always embodied the essential purist design ingredients of a fine chassis housing a fine engine. In fact, when it comes to what motorcycling is all about, the Italians and the Brits are kindred spirits.
Back in 1978 I had the delightful privilege of prising open the crate in which my brand new Ducati 900GTS had been shipped to Ongar Motorcycles. My appetite for Italian hardware had already been whetted by a 350cc Morini Strada and the Ducati did not disappoint me. Over the next 18 months and 17,000 miles, it used only an egg cup full of oil between changes thanks to progressive running-in over 2000 miles.
Enjoy more Classic Motorcycle Mechanics reading in the monthly magazine.
Click here to subscribe & save.
Traditionally, Italian machines have two major faults, poor finish and dodgy electrics. In my experience the source of the problem was quality control at the factory. You could either buy a good 'un or a wrong 'un depending on the mood of the mechanics and painters when the machine was assembled.
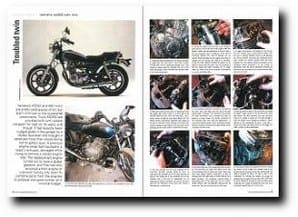
The Guzzi V50 II you see here came into my hands about four years ago in sound but jaded condition for £400. It had been owned successively by two old school friends, neither of whom were given to thrashing bikes. It had 34,000 miles on the clock and the engine had been untouched except for routine maintenance delightfully simple on such an accessible engine.
Initial riding impressions were much as I'd expected. Light and predictable handling and roadholding, a heavy clutch and even heavier throttle. The only real problem was that the clutch was obviously on its way out and would have to be replaced. It was while dismantling the bike that I decided to completely re-finish the paintwork. I also decided to repair any mechanical problems as I went along.
The original Moto Guzzi V50 was the brainchild of chief designer Lino Tonti and hailed as a 'magnificent design' by Mike Nicks, then editor of Bike magazine when the machine was unveiled at the Cologne Show in 1976.
Although the 500cc V50 was to some extent a scaled-down version of the 850cc T3, it was altogether slicker, lighter and more nimble, while retaining the virtues of a V-twin engine mounted across the frame for excellent cooling, and a shaft drive to the rear wheel for low maintenance.
That was the theory, but early machines, including the Mark IIs, were plagued by failure of the shaft drive flange bolts which, at its worst, could turn the crown wheel and pinion into blancmange. The failure was attributed to faulty washers breaking up and led to many warranty claims.
Other nasties included leaky fork oil seals, peeling paint, naff chrome and trouble with the ignition switch.
The Guzzi is an excellent machine to work on, thanks largely to Tonti's clever adaptation of an already excellent basic design. Instead of a loop frame like the featherbed, the Guzzi uses an extremely rigid, triangulated main frame incorporating the headstock which bolts to a subframe holding the engine, gearbox, shaft drive and rear wheel.
As a result, only about 45 minutes of spanner work is needed before you can effectively lift the main frame and front fork assembly away from the subframe and literally wheel it away on the front wheel. This leaves the engine sitting in the subframe, supported by the main stand.
Steps to achieving this are:
• Detaching the breather pipes from the rear of the rocker boxes.
• Detaching the carburettor intake pipes from the airbox.
• Detaching the fuel pipes from the petrol taps. (It is best to remove the petrol tank altogether by raising the seat and lifting the rubber loop which is the only fixing for the tank.)
• Disconnecting the battery.
• Detaching the HT leads from the plugs.
• Disconnecting the wiring harness at the generator.
• Disconnecting the oil pressure warning from the unit (hidden beneath the airbox).
• Detaching the footbrake control rod from the rear master cylinder.
• Disconnecting the rear brake hose from the caliper (block the hose with a matchstick and rag).
• Disconnecting the rear suspension (at either end).
• Removing the four 10mm Allen screws holding the frame rails together on either side.
• Finally, undoing and withdrawing the long pin bolt which runs across the machine from a point above the gearbox.
When it comes to parting the main frame from the subframe, have an assistant handy to hold the handlebars while the underside of the mainframe is clobbered with a rubber mallet, somewhere near the battery tray. As the mainframe comes free, it can be wheeled away and the tail end rested on the back of a chair or something similar.
I was lucky. No bolts were seized on my machine, but I have heard that the central pin bolt can seize where it passes through the alloy of the gearbox. Overnight soaking in penetrating oil should free the pin sufficiently for it to be drifted out. If not, be patient.
All fasteners were bagged and labelled — chiefly for reference since I used new ones upon reassembly. I also labelled all electrical connections since I planned to re-use the existing harness.
Since I am not a wealthy man I intended to rebuild the engine only as necessary to produce a reliable unit which would not burn oil, A fairly common fault with V50 engines is failure of the head gasket allied to burnt exhaust valves.
This comes about because the head needs to be torqued down at regular intervals — say about 2000 miles, and the valve clearances of course need to be reset. Re-torqueing the head without resetting the clearances means burnt exhaust valves are inevitable. Thankfully there is no danger of valves tangling with pistons because the Guzzi uses Heron type heads with combustion taking place in a chamber in each piston crown.
Avoid choosing a machine which obviously has badly worn bores, betrayed by blue smoke from the exhaust, because the V50's nicasil coated cylinders cannot be rebored. Cylinders and pistons must be replaced as a matched set (about £125 per side at the time of writing).
Good condition
Luckily, my cylinders were in good condition so I managed to get away with a new set of piston rings (L26). I used a large Jubilee clip as a ring compressor when I refitted the cylinders.
With the cylinders removed I checked the big ends and little ends by feeling for play. Happily there was no discernible play in any of the bearings and since the main bearings ran quietly I could see no point in further dismantling.
Neither was the gearbox showing any sign of trouble on the road, so I contented myself with an oil change.
Although all the valves looked in reasonable condition I elected to replace both exhaust valves and all springs and collets. I de-coked the heads and piston crowns, and also the inlet valve stems before reassembly using a conventional valve spring compressor.
The heads and barrels are held together with an odd combination of fasteners — two large nuts, two large Allen screws and one small Allen screw at the back. The large nuts and Allen screws were torqued down in stages to 29 Ib/ft and the little one to ten lb/ft. (When I came to re-torque these fasteners after a 50 mile shake-down run they had loosened off considerably. But when I did the job again after a further 200 miles only one Large Allen screw on each head showed any sign of needing re-torquing.)
The rear wheel is retained on its rubber cush chive by a conventional through-bolt, and with the wheel removed I was able to unbolt and remove the rear brake caliper and brake disc. I then removed the casing, partly because I wanted to paint it but also because I needed to check the crown wheel and pinion for wear or damage. They both looked in perfect condition, and the oil drained from the housing showed no sign of the metallic deposits which herald disaster.
If it works leave it alone
I am a great believer in the principle that if it works leave it alone, so after I had sprayed the rear casing with Peugeot Talbot cherry red I bolted it all carefully back together and refilled the hub with 140 grade hypoid oil up to the level hole. I reasoned that if the flange bolts were going to fail they would have done it long before the machine had notched 34,000 miles. Indeed, they may well have been replaced early in the bike's life.
The rear caliper was cleaned up and fitted with new Vesrah pads which had come with the bike from the previous owner.
The Guzzi is equipped with the factory's much-lauded linked brakes system, which, you may be surprised to learn, I do not really care for.
I was weaned on using principally the front brake of a motorcycle and absolutely loved the great big Brembos on the Ducati. The handlebar lever on the Guzzi system operates one front disc while the footbrake brings the other front disc and the rear into play.
Riders who prefer to use the rear brake find this absolutely wonderful. I do not. I even researched the possibility of adapting the Guzzi to a conventional set-up with the handlebar lever operating both front discs, but it proved to problematical and expensive.
Goodridge brake hoses would have been a good investment, but there was nothing wrong with the originals so they went back on. New Vesrah pads went into the front calipers and I expect them to last little more than 2,000 miles. They are really ridiculously thin compared to the pads used on bigger Brembos and should have been thickened up at the design stage.
Although my hands are far from small I find the brake lever is a hair out of reach and I am hoping to replace it with a match for the excellent dog-leg clutch lever which was supplied to me by 086 Motorcycles of Lichfield. This lever makes the basically heavy clutch action far less onerous — all down to good ergonomics.
Since the previous owner had just replaced the front fork oil seals, and no slop could be detected on the slider bearing, I withdrew each fork leg complete from the yokes after draining out the oil. I planned to have the alloy sliders refinished in red to match the overall red scheme for the bike, so I set them aside until later.
I could feel that the steering head bearings were past it — they felt notchy and had a worrying tendency to centralise. I had hoped to replace them with tapered bearings but this proved to be impossible. I had something of a shock when Motomecca asked over £50 for a set of standard races. Why should they be so expensive? But it was Hobson's choice. I had to have them.
One race drifted into the headstock without difficulty but the other refused. I even tried sticking it in the freezer for a few hours but still could not get it to fit. Eventually I took the frame and race to my friendly local garage who completed the job. I didn't dare ask how they managed it.
The final reassembly was straightforward. New balls were held in the upward-facing halves of the races with grease as the bottom yoke was carefully offered up at the headstock until I could run the nut down on the threaded column. I took great care not to overtighten the races as this can lead to dubious steering characteristics.
Incidentally, I decided to refinish both yokes in red rather than keep the standard polished alloy finish.
For the full story, view the original document.
Advert
 Enjoy more Classic Motorcycle Mechanics reading in the monthly magazine. Click here to subscribe.